Kernel programming

Implementation notes for Embedded Linux

This post hosts a few blurbs about issues I ran into when developing for Embedded Linux and did not find decent documentation on google. It will update as I plow through more stuff.

Getting the telnet server (telnetd) to accept connections when using DENX SELF

By default, if you try to connect to the server, you’ll get an error claiming “all network ports in use”. This is not so much of a SELF configuration thing, rather how the kernel is set up by default. Assuming you ran MAKEDEV (see my installation post) when installing the ELDK, you’ll have a few /dev/ttyp devices. As I understand, telnetd attaches to these pseudo ttys to send/receive data from a user (one each). However, the kernel is not set up by default to install the driver for PTY devices.
The solution is to run menuconfig (or xconfig) and include the Legacy PTY device support in the kernel (under Device Drivers -> Character Devices). After you’ve deployed your kernel, telnet should be able to connect. Make sure to create a user with a shell for telnet, otherwise you won’t be able to log in.

Setting up the FTP server for upload support when using DENX SELF

The SELF image has wu-ftpd set up, but it does not allow uploading files by default. Doing this is rather simple – simply modify /etc/ftpaccess as follows:

  • Change the “no” just right of chmod, delete, overwrite to “yes”
  • Add “upload / * yes” with no quotation marks just below this list

Some images segfault before main

This one had me scratching my head for a few hours. I wanted to deploy dropbear on the target so I downloaded the latest source and compiled it. I then went ahead to deploy dropbear and dropbearkey only to see that dropbear shows a segmentation fault before main. At first I thought it was some shared library issue, but setting the LD debug flag did not print out anything – it was crashing before pulling in any objects.
I thought perhaps the kernel was not configured properly for ELF files but it was. I then rebuilt binutils (so that I will have the latest and greatest) and ran readelf on my Ubuntu station on both dropbear and dropbearkey – it showed everything was great. However, I then cross-compiled readelf and tried running it on the target’s dropbear and dropbearkey – it showed the dropbear ELF was corrupt (bad section header offsets).

After more investigation i saw an offset of 1 byte when reading the section headers – but only on the target. Looking manually at the hex dump for the dropbear image on my PC showed it was perfect. I then looked at the sizes of the images – dropbear on the target was 3 bytes smaller than dropbear on my PC, even though they’re the same file…

To make a long story short – it turns out that FileZilla (my FTP client) did some CR/LF manipulation when sending the file to the target. Setting the transfer mode from “Auto” to “Binary” did the trick. D’oh!

Using Eclipse to debug the kernel with Abatron BDI3000

The Abatron BDI3000 supports a GDB frontend (bdiGDB) so we can pretty easily set up Eclipse to debug the kernel. I used an external plugin for this – the Zylin embedded CDT (download/installation instructions here). Once that’s installed, we create a Debug configuration (Run -> Debug Configurations) under Zylin Embedded Debug (Native). In the Main tab we set the C/C++ application to the applicable vmlinux (there is no need to set a project) and in the Debugger tab we leave everything default and browse to set GDB debugger to the appropriate GDB (for example, ppc_8xx-gdb). Finally, in the Commands tab we set Initialize commands to “target remote {bdi-ip}:2001″ and Run commands to “c”.
To actually perform debugging, I attach the GDB only after Linux has initialized the MMU (I chose to break at __start_here). To do this, I telnet to the BDI and perform:

reset  
bi {__start_here offset, taken from the System.map file, e.g. bi 0xc00021e0}  
go  

The target should stop at __start_here. At this point I can set breakpoints to debug the kernel boot process and start debugging in Eclipse. To debug again, terminate the GDB process by clicking the red button or Ctrl+F2 and re-enter the BDI commands above. There is no need to do the clear/set breakpoint dance with Eclipse – it will remember your breakpoint settings and reapply them every time you connect. The BDI does not do this, however, so you need to always re-perform bi.

Debugging U-Boot (after relocation) in Eclipse

This is quite similar to debugging the Linux kernel in eclipse, so follow the above paragraph with the following differences.

  • You need to obtain the address to which U-Boot relocates to in RAM. This can either be done the DENX way or by adding a printf to board_init_f, printing out the last argument, addr, to relocate_code
  • You’ll also need the address of board_init_r, which is called immediately after relocation to RAM. Just find it in u-boot.map and add its value to the relocation address you obtained in the first step. This will give you the absolute RAM address at which board_init_r resides after relocation
  • In the Main tab, instead of vmlinux you’ll need to point to the u-boot file in your U-Boot root directory
  • In the Commands tab, set ‘Initialize’ to:
    • target remote {bdi-ip}:2001
    • symbol-file
    • add-symbol-file {u-boot-dir}/u-boot {u-boot-ram-relocation-address}
  • In the BDI telnet session, follow the same thing as Linux debugging only break on board_init_r’s absolute RAM address

The rest should behave just like Linux debugging – reset in BDI, set the breakpoint, go; target will stop, attach via Eclipse.

Applying a patch from GMail

Many mailing lists have a host of patches, embedded inline posted messages. When subscribing to these lists with a GMail account, you may find yourself wanting to apply one such patch. The problem is that GMail’s web interfaces will manipulate the hell out of the received messages (whitespaces and line wraps mostly) – this will at best break checkpatch and at worst break compilation.

To create a working patch, I simply click on the little blue drop down icon on the upper-right corner of the message holding the patch and select “Show original”. You can safely copy/paste this into a text file and apply.

Implementing a preemptive kernel within a single Windows thread

About three years ago I developed a real-time operating system aimed at the new generation of 32 bit microcontrollers. Seeing how I am a devotee of developing/testing embedded software on a PC and only then porting/testing to the target, one of my goals was to get a working simulation environment under Windows. I had thought at the time that I would have a lot of reference, seeing how most real-time operating systems (FreeRTOS, for example) have Windows ports. To my surprise no port implemented true preemption, instead opting for simply wrapping the Windows API with the equivalent RTOS API (for example, creating an RTOS thread would call Windows’ CreateThread).

Functionally this allows users to develop under Windows, calling the RTOS API as they would on the target and testing their application under Windows. However, there are two drawbacks to this:

  1. The result of such a simulation, while usually sufficient, is quite synthetic. A lot of behavior is due to change when porting back to the target because Windows cannot be (easily) made to behave like an RTOS – especially in the aspect of predictable scheduling
  2. As an RTOS developer you can’t write and test kernel code under Windows and as an application developer you cannot familiarize yourself with the underlying kernel state at a given time, seeing how no such state exists

It is therefore beneficial to have as much of the RTOS kernel as possible running under Windows and for the most part this is quite straightforward. Most context switches occur when the application calls an OS API – like sleep() or giving a semaphore. Let’s assume we have a single Windows thread and we implement the following piece of code:

// the first thread entry
first_thread()  
{
    unsigned int counter = 0;

    // forever
    while (TRUE)
    {
        // increment counter
        counter++;

        // sleep for a period of 0 (yield the scheduler)
        rtos_sleep(0);
    }
}

// the second thread entry
second_thread()  
{
    unsigned int counter = 0xFFFFFFFF;

    // forever
    while (TRUE)
    {
        // decrement counter
        counter--;

        // same as first_thread
        rtos_sleep(0);
    }
}

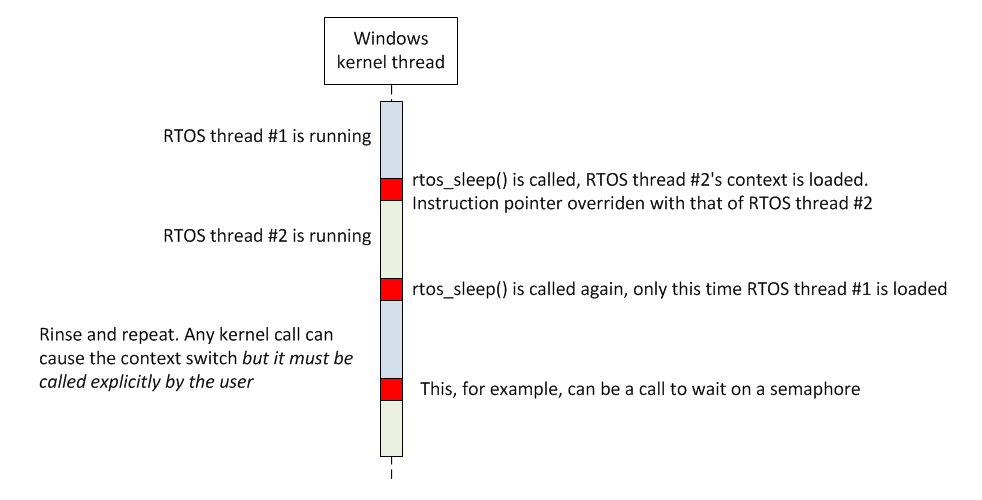
In this simple scenario, we create two RTOS threads and expect them to work concurrently. Seeing how we only have one Windows thread, we need to be able to switch between the two contexts (each thread has a stack and different register states). In this case, actual context switch will occur on the call to rtossleep(). If we were to follow the trace of execution (remember – we have only one Windows thread) we will see that it starts by entering firstthread, having the stack pointer pointing to the first thread’s stack. It will then increment the counter on firstthread’s stack and enter rtossleep. This kernel function will revoke the firstthread’s right to continue and then load the secondthread’s context (its stack and registers). The Windows thread will then continue to execute and, seeing how it loaded secondthread’s instruction pointer register, start running secondthread.

Some pic here

Such behavior can allow for simulating a LOT of functionality – thread priority, thread state, waitable objects like semaphores, and the like – but all of the context switches can only be made when the user calls an RTOS API. Effectively, we have simulated a cooperative kernel, in which the user must call the kernel every so often to enable other threads to run. There are so many examples of implementing a cooperative context switching mechanism in Windows out there that I am not going to go into the details of how we actually do the magic behind this example (creating the thread, swapping contexts and the like). I’m sure Google can provide many excellent sources.

From cooperative to preemptive

We are interested in allowing for these two threads above to share CPU without calling an RTOS API. We want to be able to have the firstthread loop in place and still allow for secondthread to run. This will allow us to implement timers, interrupts and time-slice scheduling (that is, sharing CPU fairly among same priority ready-to-run threads). To be honest I was quite stumped with this for a few days. I needed to find a way to somehow alter the flow of execution of the Windows thread running the kernel, whichever block of code it may be running. When I figured out how to do this I was pretty awe struck at how simple it is.
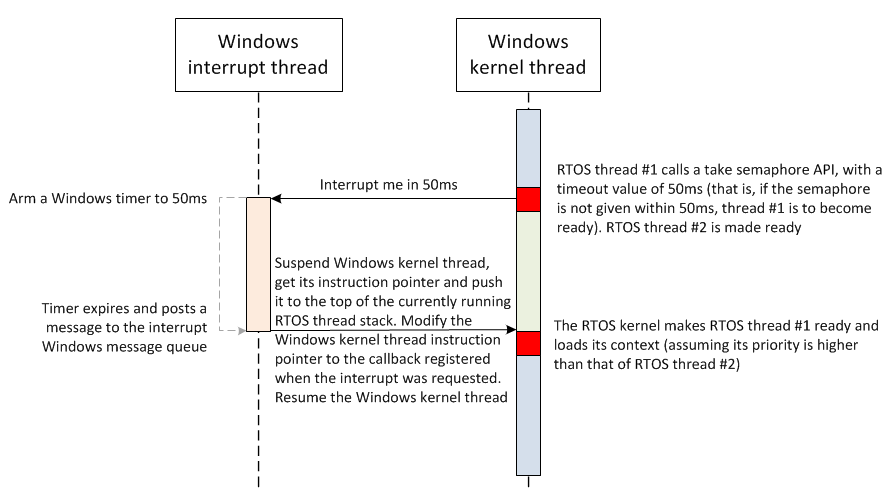
We start by spawning a second Windows thread – this thread will serve as the interrupt thread. Overall, we will only need two Windows threads: the interrupt thread (running in high Windows priority) and the kernel thread (running in normal Windows priority), which will run the RTOS threads, however many they may be. Whenever we’d like interrupted rescheduling to be performed we post a message into the interrupt thread’s Windows message queue. This will be either periodically (using an auto-renewing timer) or deferred (using a one-shot timer).

The magic occurs once the interrupt thread receives the request to interrupt. At this point in time, the interrupt thread will simply hi-jack the kernel thread – changing its current point of execution to a block of code that performs saving the current context and loading the next one. This is done by using GetThreadContext and SetThreadContext.

// hijack the windows thread running our kernel - once
// it becomes ready it will jump to wcs_isr_reschedule
void wcs_intsim_do_interrupt()  
{
    // initialize context flags 
    CONTEXT ctx;
        memset(&ctx, 0, sizeof(ctx));
        ctx.ContextFlags = CONTEXT_FULL;

    // suspend the kernel thread
    SuspendThread(wcs_intsim_thread_to_interrupt_handle);

    // get its windows thread context
    GetThreadContext(wcs_intsim_thread_to_interrupt_handle, &ctx);

    // push the address we want to return to 
    // (which is wherever the RTOS thread is now)
    // after our simulated ISR to the RTOS thread's stack
    ctx.Esp -= sizeof(unsigned int *);
    *(unsigned int *)ctx.Esp = ctx.Eip;

    // set the instruction pointer of the kernel 
    // thread to that of the ISR routine
    ctx.Eip = (DWORD)wcs_tick_isr;

    // set context of the kernel thread, 
    // effectively overriding the instruction ptr
    SetThreadContext(wcs_intsim_thread_to_interrupt_handle, &ctx);

    // resume the kernel thread
    ResumeThread(wcs_intsim_thread_to_interrupt_handle);
}

We push the current kernel thread’s instruction pointer register to the top of its stack (so that the current RTOS thread can resume execution once its ready again) and then override it with a pointer to our (naked) routine performing the save and switch context. Once the interrupt thread goes back to pending on its message queue, the kernel thread will resume and effectively handle the interrupt (again, by saving current context and loading the next RTOS thread).

Another pic here

And now some code

The RTOS I implemented was very feature rich – it supported waiting on multiple objects, a variable tick timer (that is, a tick only occured when needed), a zero overhead heap, and many other cool things – all fully simulated. I extracted the essence of this article from that RTOS into a single C++ module (360 lines of commented code, I didn’t even attach a header) that was tested under x86 running Windows 7, compiled with VS 2008. In this example I only show the simplest form of preemption – a constant tick that time slices between two threads which are created before the kernel starts running. This is only a proof of concept – building atop of this, one can implement pretty much everything an RTOS offers (dynamic thread creation/deletion, waitable objects, timers, etc).

Get the demo from github.

U-Boot / Linux bringup by example

This post describes the steps required for setting up an Ubuntu based compilation and debugging environment for U-Boot and Linux 2.6 w/a JFFS2 filesystem on a custom PPC board, using an Abatron BDI3000. It mostly discusses the environment and doesn’t dive too much as to how to customize the packages for your specific board (this is the hard part, but also extremely board specific). While you will probably not follow this guide from start to finish, it serves as a reference for what is the minimal amount of work required to build U-Boot and Linux for a PPC8xx board and a supplement to the DENX DULG, which is a must read.

It assumes that Ubuntu is already installed on the station, but nothing else. On the host side we mostly need the ELDK – a single package that contains all the cross tools needed (compiler, linker, debugger, tools to generate a file system, etc.).

A basic U-Boot/Linux target requires four things:

  • A U-Boot binary (u-boot.bin) generated by customizing the U-Boot sources for your board, compiled using a cross-compiler (ppc_8xx-gcc in our case) and burned to the correct offset in the flash
  • Linux image (uImage) generated by compiling the untouched Linux sources
  • A Flat Device Tree BLOB (.dtb file), generated by compiling (using a specialized compiler) a textual DTS file which describes busses, offsets and devices of the target board
  • A Root file system containing all the files we’d like to appear on the target once it’s up, packed into a single file. This file is generated by packaging up a directory from the ELDK which contains all the tools compiled for the architecture using the appropriate file system maker (in our case, mkfs.jffs2).

Step 1: Getting the sources

In this step we install git (the source control system), eldk (the development environment), U-Boot (the bootloader) and Linux (the OS). Start by getting eldk 4.2 for PPC (iso) from here (The file is under /pub/eldk/4.2/ppc-linux-x86/ppc-2008-04-01.iso). Keep in mind that this may be very slow as the file is 1.9 GB; I used GetRight on windows to pull the file from all the mirrors concurrently.

Create a working directory in your home directory:

mkdir ~/dev
cd ~/dev

Get git:

sudo apt-get install git-core

Get U-Boot sources:

git clone git://git.denx.de/u-boot.git u-boot/

Get Linux sources:

git clone git://git.denx.de/linux-2.6-denx.git linux-2.6-denx/

Step 2: Installing the ELDK

Create an installation directory under your working directory (e.g. ~/dev/eldk)

mkdir eldk
cd eldk

Create a mount point for the ELDK installation CD and mount it (prepend the path of the iso to the file):

sudo mkdir /mnt/eldk-inst
sudo mount -o loop,exec ppc-2008-04-01.iso /mnt/eldk-inst/

Install the eldk for the ppc8xx architecture

/mnt/eldk-inst/install ppc_8xx

Add eldk to path by appending the following in ~/.bashrc using a text editor of choice (make sure to show hidden files). After this is done, make sure to re-open a terminal window for the next steps:
PATH=$PATH:~/dev/eldk/usr/bin:~/dev/eldk/bin
export PATH

Test this by running the following in your dev directory:

ppc_8xx-gcc

You should see the standard gcc “no input files” error.

Step 3: Preparing a JFFS2 filesystem

The ELDK contains a basic yet functional file system that we can use. It is packaged as a ramdisk image and we need to extract it so that we can build a JFFS2 image. Strip the prepared ramdisk of its 64 byte header, revealing a gzipped file. Unzip it to receive ramdisk_image

cd ~/dev/eldk/ppc_8xx/images
dd if=uRamdisk bs=64 skip=1 of=ramdisk.gz

Mount the image and give everyone access/execute permissions to it

sudo mkdir /mnt/rootfs-inst
sudo mount -o loop ramdisk_image /mnt/rootfs-inst
sudo chmod -R 777 /mnt/rootfs-inst/

Generate the JFFS2 image assuming a sector size of 128KB (0×20000), in this case

mkfs.jffs2 -b -r /mnt/rootfs-inst -e 0x20000 -o image.jffs2

Step 4: Finishing up environment installation

The development station requires a TFTP server for two reasons: the BDI3000 TFTPs a configuration file each time it loads and U-Boot will fetch the Linux images via TFTP once it is burnt to flash. We must therefore install a TFTP server and set up its directories.

First, we’ll install atftpd:

sudo apt-get install atftpd
sudo gedit /etc/default/atftpd (modify to USE_INETD=FALSE)
sudo invoke-rc.d atftpd start
sudo chmod 777 /srv/tftp

We then create three directories @ /srv/tftp:

mkdir /srv/tftpd/u-boot
mkdir /srv/tftpd/linux
mkdir /srv/tftpd/bdi3000

Configure the BDI’s server IP address. See BDI documentation for more info how to do this.

Step 5: Compiling U-Boot to receive a burnable u-boot.bin

Customize U-Boot for your board. For a custom board with SDRAM and 8MB Flash, I had to:

  • Create a directory under /board/myboard and have a Makefile, config.mk, u-boot.lds and myboard.c. You can copy these files from the standard ep8xx board
  • myboard.c implemented the following functions:
    • checkboard: Just printed a banner
    • initdram: Initialize the SDRAM
    • boardpoweroff: Reboot hook (didn’t implement anything here)
    • ftboardsetup: Fixed up the FTD BLOB passed to Linux with information gathered by U-Boot
  • Add a header file under include/configs/myboard.h with all the preprocessor directives. Again, you can reference the standard ep8xx board, but make sure to define CONFIGOFLIBFDT and CONFIGOFBOARDSETUP. Otherwise Linux will not boot because it doesn’t receive the FDT BLOB
  • Add the board to the main Makefile (you should be able to easily understand using ep8xx as an example) Clean, just to make sure

    make distclean make clean

And then compile it

make my_board
make

Step 6: Compiling Linux

Start by installing ncurses, required for menuconfig

sudo apt-get libncurses5-dev

At this point you will have to customize Linux. For PPC this mostly means creating a compilable device tree file (with a .dts extension) which describes the offsets of the core peripherals and such (instead of instantiating drivers in code). This is not trivial and is yet another syntax/structure to learn, but at least you have examples in the form of dts files for existing boards. In addition, you will also have to create a default configuration in arch/powerpc/configs, a custom platform in arch/powerpc/platforms (which will, at least, initialize I/O pins) and modify arch/powerpc/platforms/Kconfig + arch/powerpc/platforms/Makefile to support your new platform. Simply go by example of existing boards and check out this PDF.

Build Linux and the FDT BLOB (DTB file)

make ARCH=powerpc CROSS_COMPILE=ppc_8xx- my_board_defconfig
make ARCH=powerpc CROSS_COMPILE=ppc_8xx- uImage
make ARCH=powerpc CROSS_COMPILE=ppc_8xx- my_board.dtb

Step 7: Burning and configuring U-Boot

The following sections assume the following offsets: Flash starts at 0xFF800000 which is where the Linux kernel resides (until 0xFF9DFFFF), the DTB file resides at 0xFF9E0000 until 0xFF9FFFFF, the JFFS2 filesystem image resides at 0xFFA00000. Finally, U-Boot resides at 0xFFF00000.

Set up your BDI with a configuration script that will allow you to attach to the board and erase its flash. Define the sectors on which u-boot will reside so that the erase command will know what to delete. Copy u-boot.bin (from ~/dev/u-boot) to /srv/tftp/u-boot and then telnet to the bdi.

reset
erase
prog 0xfff00000

Open a serial connection to the target. Setup u-boot to auto-load the kernel at 0xFF800000 and pass the DTB @ 0xFF9E0000.

setenv ethaddr 00:e0:6f:00:00:01
setenv ipaddr [target-ip-address]
setenv serverip [your-pc-ip-address]
setenv bootargs root=/dev/mtdblock2 rw rootfstype=jffs2
setenv bootcmd bootm 0xff800000 - 0xff9e0000
setenv bootdelay 3
saveenv

Step 8: Burning Linux, the DTB and the Root filesystem

Copy image.jffs2 created earlier and uImage, my_board.dtb from arch/powerpc/boot to the /srv/tftp/linux directory. Using the U-Boot console, download the images to RAM via tftp. After each download, note the size printed by u-boot in hex: Bytes transferred = 1284822 (139ad6 hex). You will need this for the next step.

tftp 0x100000 /linux/image.jffs2
tftpboot 0x400000 /linux/uImage
tftpboot 0x800000 /linux/my_board.dtb

Burn the images to the flash

erase 0xffa00000 0xffcfffff
erase 0xff800000 0xff9fffff
cp.b 0x400000 0xff800000 [linux-size-in-hex, e.g. 139ad6]
cp.b 0x800000 0xff9e0000 [dtb-size-in-hex]
cp.b 0x100000 0xffa00000 [jffs2-size-in-hex]

Power cycle the board – Linux should be up. Easy!